Live missions
STANAG On Demand Server supports the following Live FMV modes:
- Live LowLatency mode (WebRTC)
- HQ mode
- Live DVR mode (HLS + recording)
These modes address two contradicting requirements for low latency vs. high quality.
Live
Implementation - WebRTC
This mode allows video preview with low latency. The server transcodes video on the fly into VP8 format that can be fed directly into the browser. Users can configure bitrate and resolution. Higher bitrate and resolution mean higher quality, but the tradeoff will be the bandwidth. It is also possible to configure video passthrough for h264 streams. In this case, the original video is used, so you cannot control the bitrate/resolution.
Depending on the video source profile you may expect 100 - 1000 ms latency.
HQ (High quality)
Implementation - HLS
This mode allows video consumption with an original quality.
The tradeoff will be some delay (depends on the HLS segment duration)
In this mode, you may expect about 10 sec latency.
Unlike Live mode, HQ (Live HLS) scales much better. Using CDN, you may serve a large number of concurrent clients without (almost) any additional load on the server.
HQ mode is only available if USE_LIVE_RTSP_HLS is set to true.
DVR
Implementation - Live HLS + HLS recording.
This mode allows video consumption with original quality as well as DVR functionality.
The tradeoff will be a significant delay (depends on the HLS segment duration)
In this mode you may expect 30 - 40 sec latency.
Unlike Live, HQ mode scales better. Using CDN, you may serve a large number of concurrent clients without (almost) any additional load on the server.
DVR mode is only available if the recorder is activated.
Please note that the recording process involves splitting the stream into a series of short media segments, which are then placed on a web server. As a result, the client cannot start HLS playback immediately after the recording begins. Instead, a stream manifest must first be created, and at least a few segments should be accumulated before playback can commence. The time required for this to happen depends on the selected segment duration, so it may take some time before high-quality playback becomes available. Once the segment recording is complete, the server will ingest metadata, and the area, track, etc., will gradually become available for analysis and geo queries.
There is one more mode, with proprietary implementation which generally only used for preview and debugging purposes.
Live low latency
Implementation - Proprietary Websockets
This mode allows video preview with low latency. In order to achieve this goal, the server must transcode the video on the fly into a format that can be fed into the browser, without the need for plugins. Users can configure bitrate and resolution. Higher bitrate and resolution mean higher quality, but the tradeoff will be the bandwidth.
Additionally, as a stream is sent to each and every client, this mode requires more processing power and network resources than the HQ mode, hence limiting the number of concurrent users.
Depending on the video source profile you may expect 150 - 400 ms latency.
Live low latency mode is always active, so if there is a video stream available it can be seen without any additional actions.
Video Stream configuration
STANAG On Demand Server works with Platforms (such as UAV, vehicles, etc). Every Platform can have one or more video Sensors. The network configuration of video sources provided by the Platforms.yml file that should be placed into data directory.
- Platform configuration Platform configuration
- Live Preview configuration Live stream configuration
Live low latency video preview
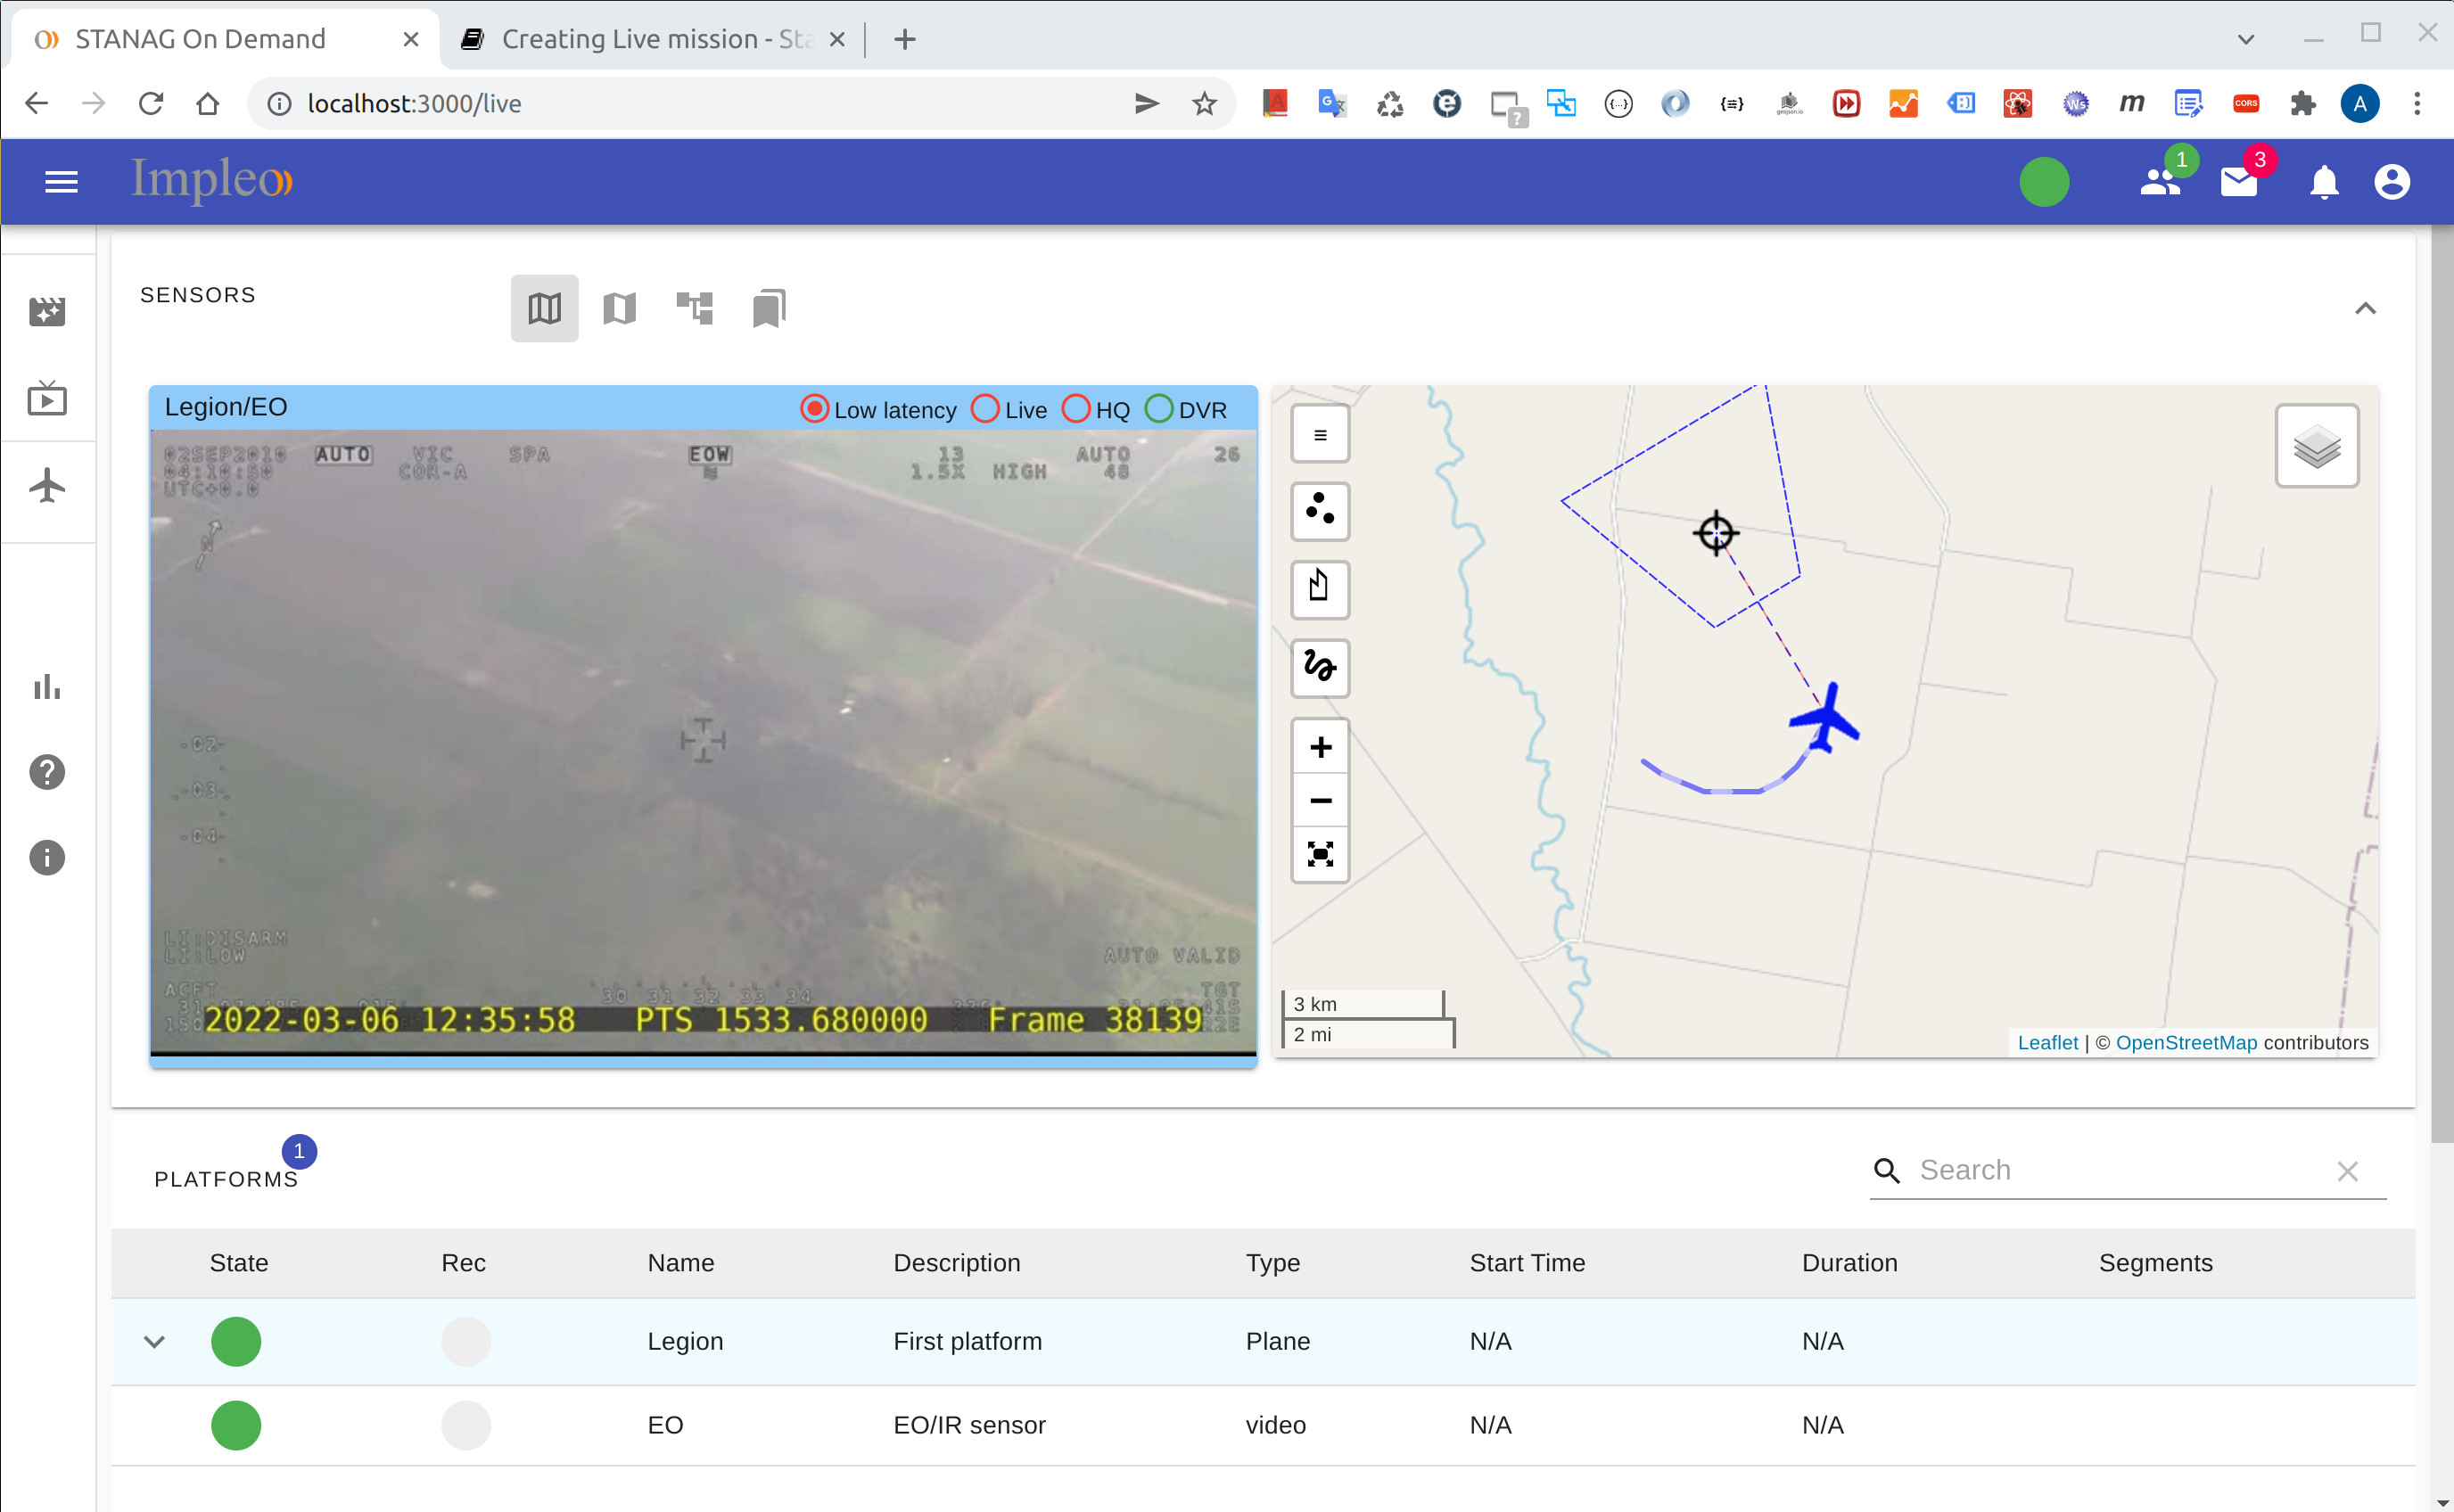
You can see the low latency video preview by selecting the desired Sensor in the PLATFORMS table. When the entire Platform is selected all available sensors will be shown.
In addition to live video, the platform position with the sensor's footprint will be also shown (if relevant metadata exists, of course).
Every sensor has a status icon, that represents its current state.
Live stream can be in one of the following states:
- Unknown. This state will be reported when Stream Monitor goes offline (or not started yet) and therefore there is no info on the stream available.
- Offline. Stream not present.
- Online. Stream available.
- Lost. Stream lost (not detected for the period of time specified by --timeout. After that, the stream is considered as Offline.
The built-in stream monitor (Supervisor, optional) provides some additional information on live streams.
For more info, see Supervisor
Recorder / HQ control
You can control the recorder in the Platforms window.
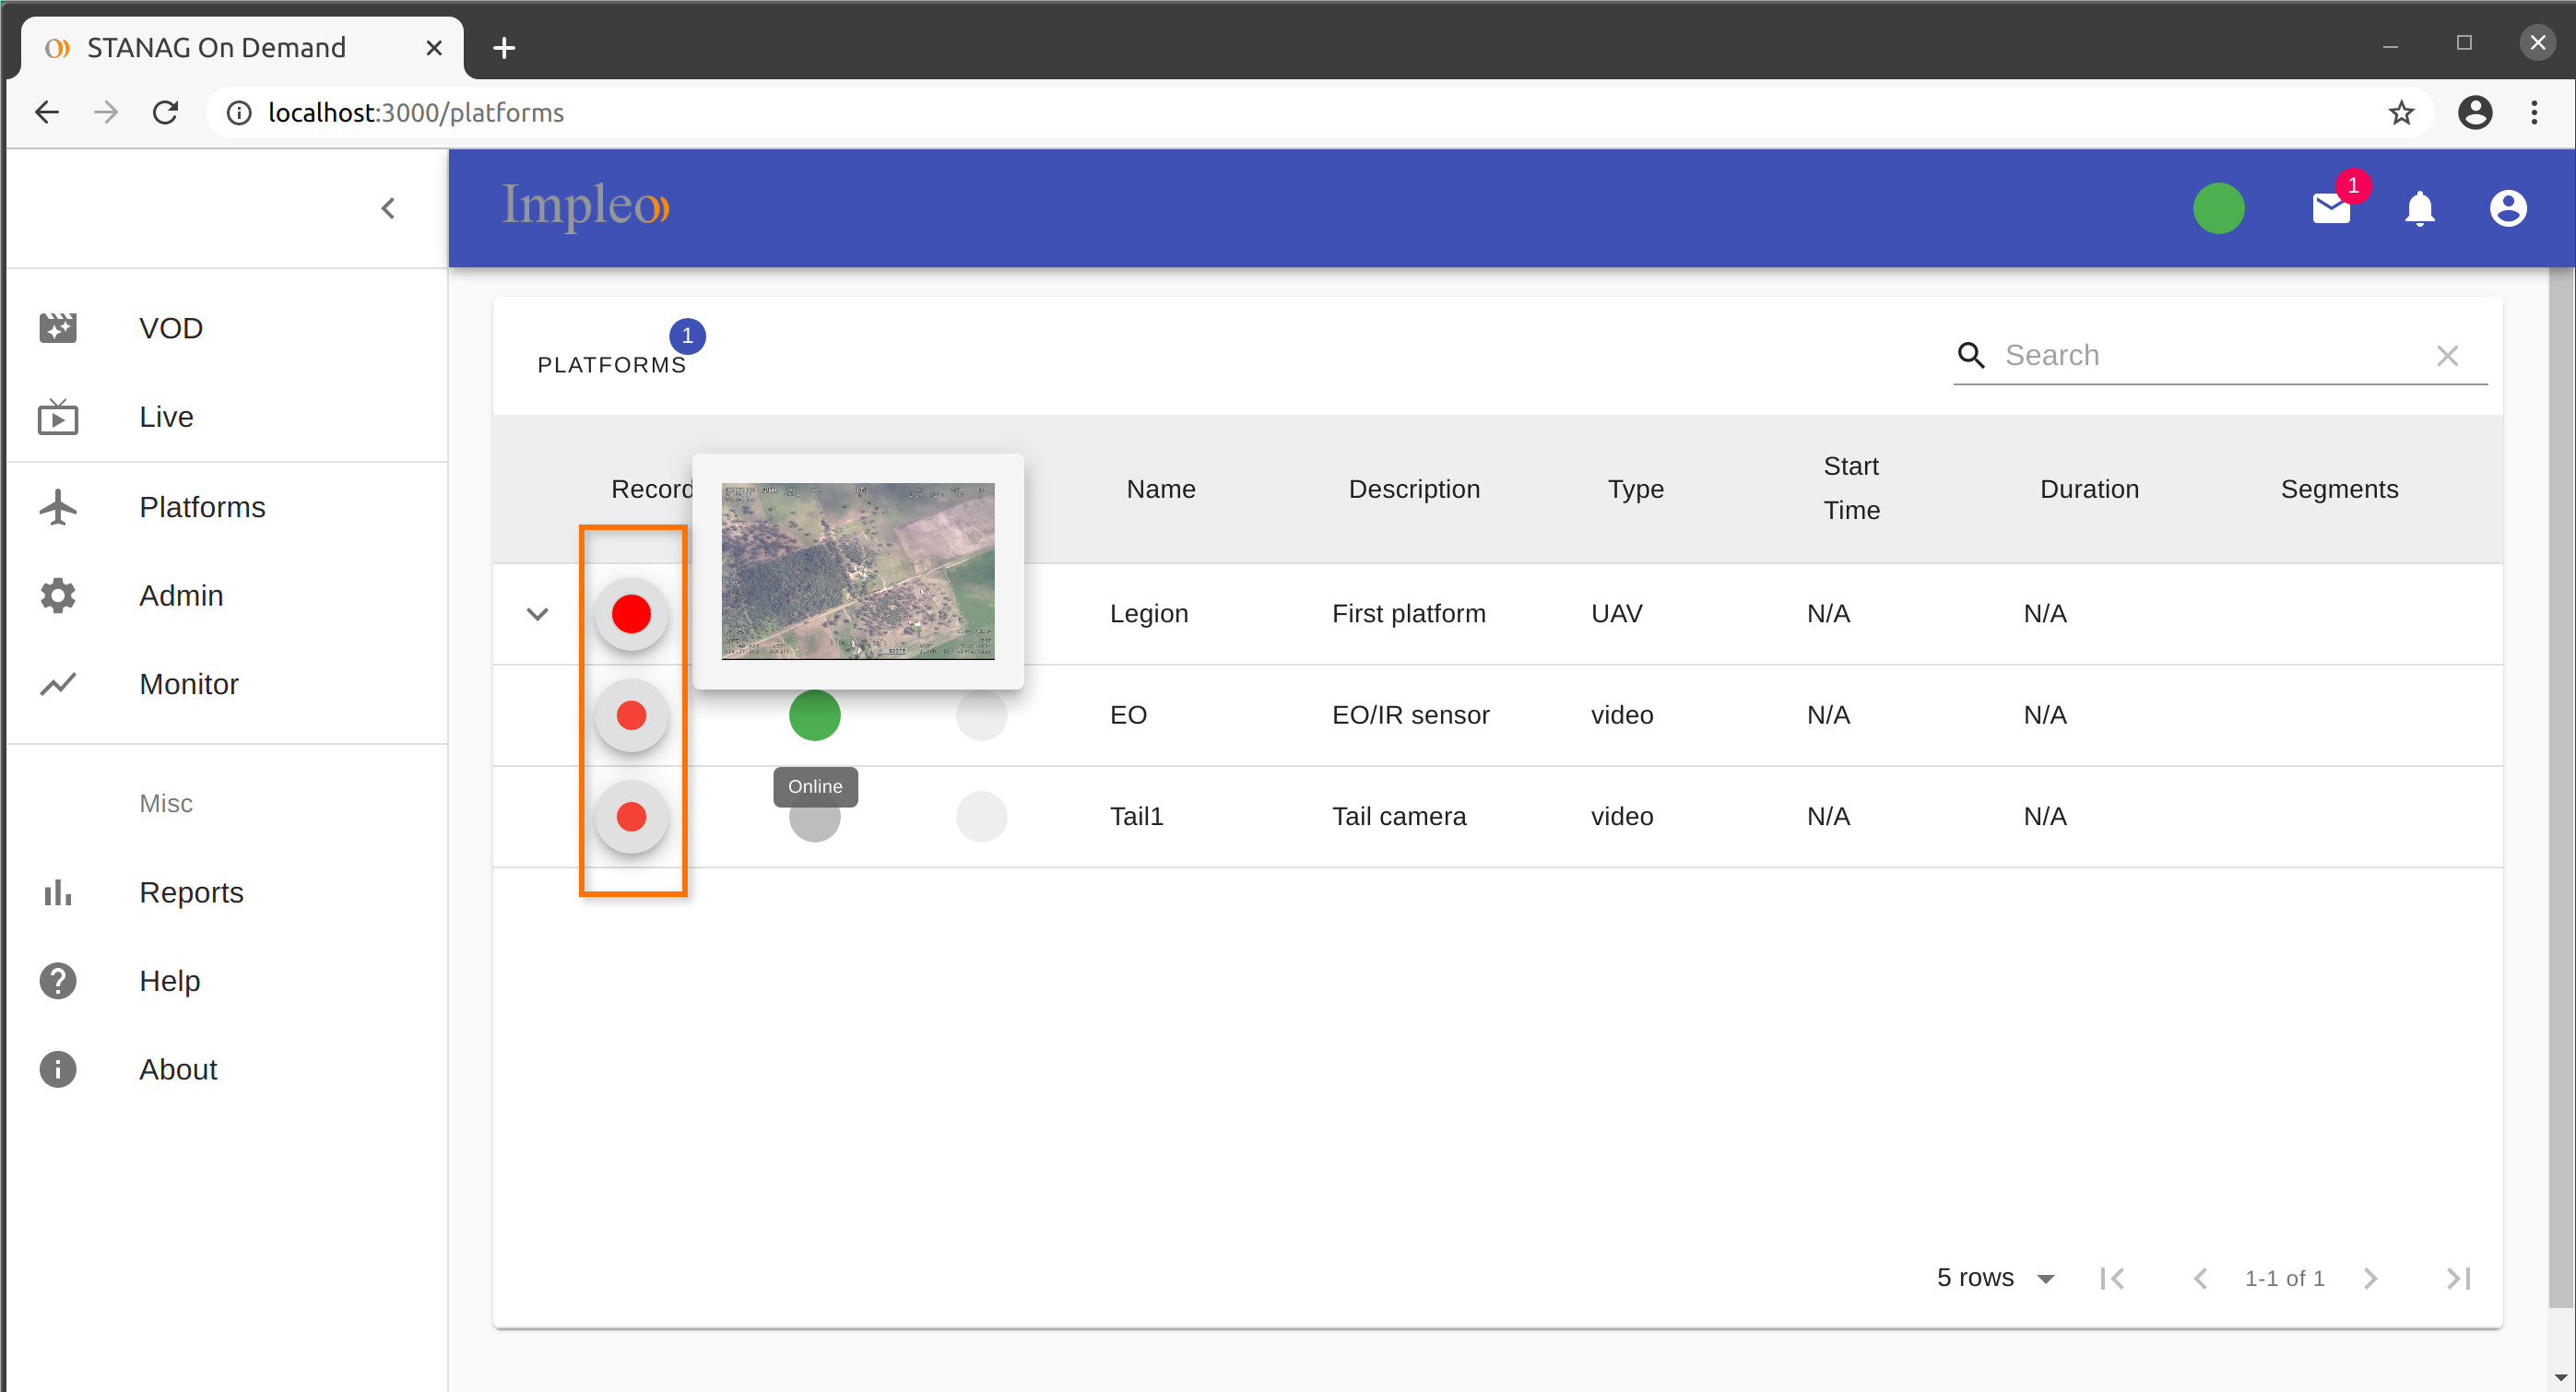 You can see a thumbnail-size video preview by hovering over the sensor state icon.
As the logical output of the recording will be Mission, we must provide some mission-level information before starting an actual recording. Select the desired platform's sensors (or entire platform) and click Record button.
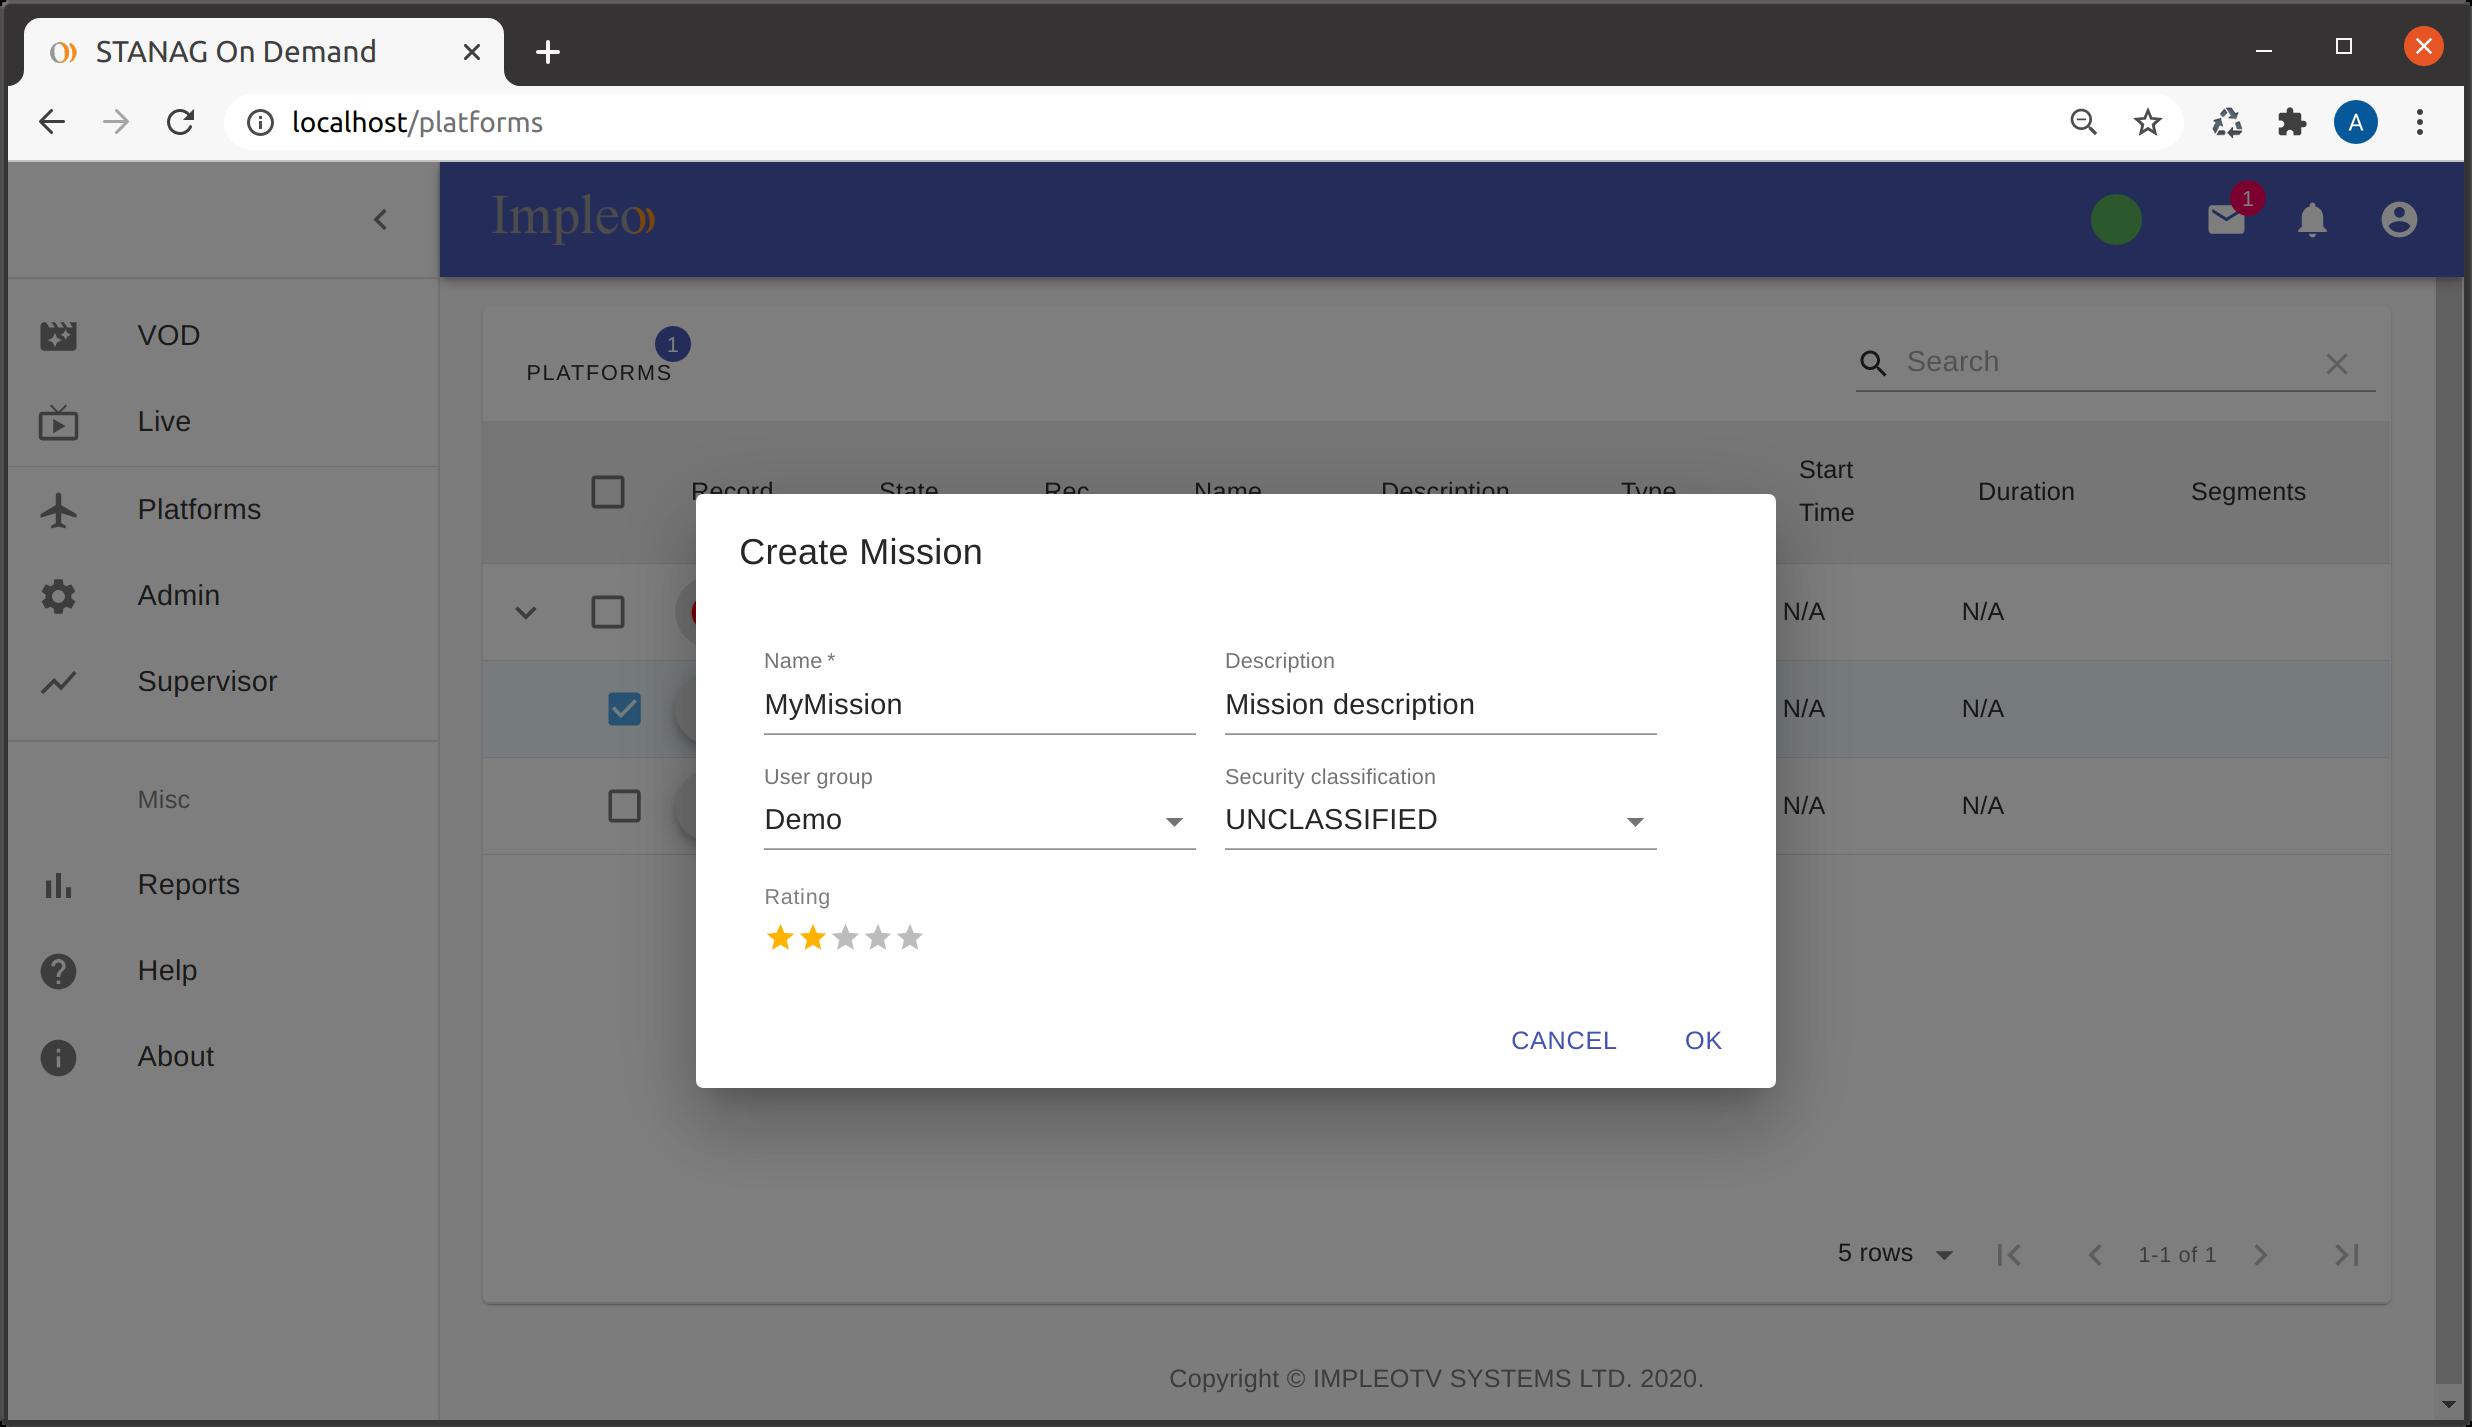
Fill in mission descriptive information and press Ok. The recording will start.
If you clicked a Mission level record button, all active sensors will be started.
If the Sensor level record button was clicked, only that particular sensor will be activated.
When you want to stop recording, there are some options available:
- Stopping all sensors and closing (finalizing) the mission.
- Stopping specific sensor and keep the mission running (even with no active sensors). This mode allows later sensor recording restarting, in a way that the sensor clips will belong to the same mission.
Use Mission or Sensor level record stop button depending on the required functionality.
You can find some advanced configuration options in the sensorHls section of ./data/config.json file. More on advanced config.
Switching between modes
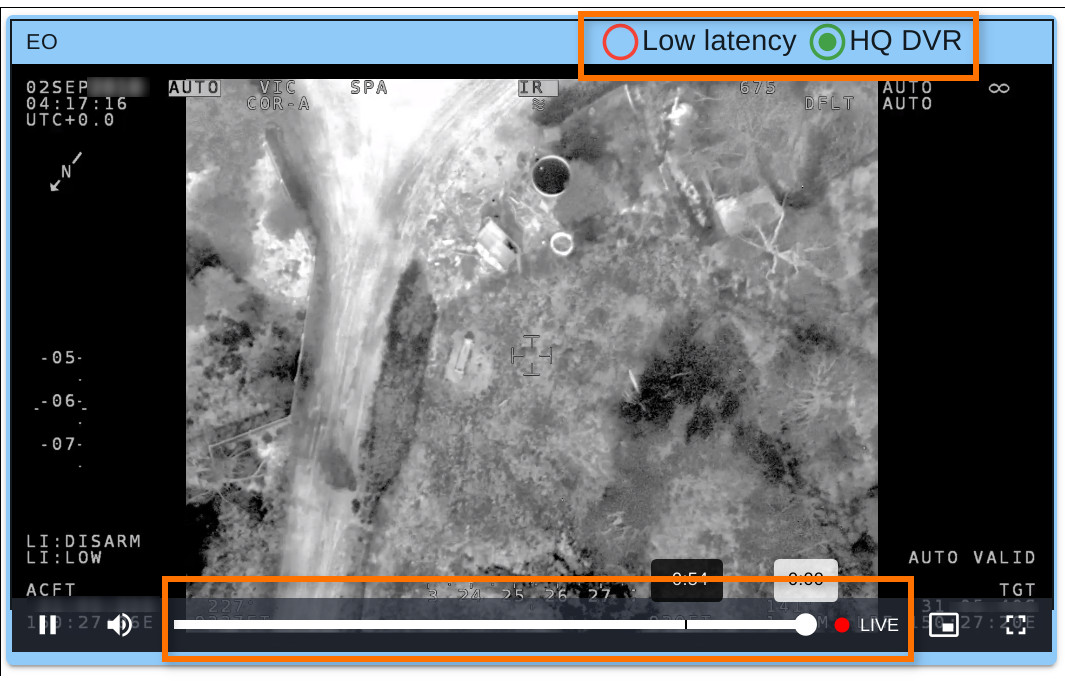
You can switch between Live, HQ and DVR modes using the selection buttons at the top of the video window. When in DVR mode, you can use DVR functionality - there will be a slider shown at the bottom of the video window, so you can go back into the recording, use time-shifted recording, live pause, etc.
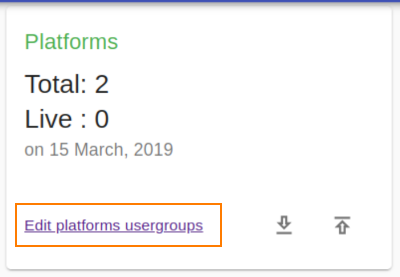
Granting Access to live streams
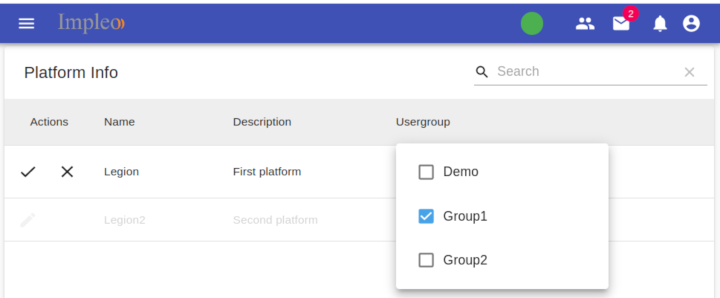
While the admin users will have unrestricted access to the live streams, regular or guest users will only be allowed to access the streams coming from the platform they have been granted access to. To grant access to a particular platform, the admin user must assign the user to the corresponding user group.
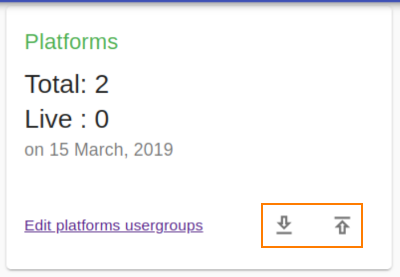
Select Edit platforms usergroups
and assign the user to the usergroup.
Reloading configuration file
You can download or upload the configuration file using the buttons on the Platforms section, as shown below.