Getting started
Step 1: Create the Host Directory for the Socket
mkdir -p /home/myuser/tmp/image2udp_sock
chmod 777 /home/myuser/tmp/image2udp_sock

sudo chown myuser:myuser /home/myuser/tmp/image2udp_sock/test.sock
The /home/myuser/tmp/image2udp_sock directory will store the socket file.
chmod 777 is okay for testing. In production, restrict it to a proper user/group.
Note: Your client app must have an access rights to the socket.
Step 2. Configure your docker-compose.yml
services:
  image2Udp:
    image: impleo/image2udp:1.0.0
    container_name: image2udp
    restart: unless-stopped
    network_mode: host
    command: ["./image2udp", "--socketPath", "/sockets/test.sock"]
    volumes:
      - /home/myuser/tmp/image2udp_sock:/sockets
    devices:
      - /dev/video0:/dev/video0
    user: "${MY_UID}:${MY_GID}"
    environment:
      SOURCE_TYPE: capture
      SOCKET_PATH: /sockets/test.sock
      # CAPTURE_DEVICE_NAME: /dev/video0
      # PATTERN: randomColor
      RESOLUTION: 640x480
      FRAMERATE: 30.0
      ENCODE_VIDEO_BITRATE: 1000 # in kbit/s
      TARGET_URL: udp://127.0.0.1:12345
      # MULTICAST_IFACE: ""           # or eth0 for example
SOURCE_TYPE - the source of the video. Can be one of:
-
socket - main mode. image2udp app expects to receive a packet containing video, timestamps and data
-
emulate - testing mode. image2udp will create the video frames
- capture - testing mode. image2udp will use the video capture device, like webcam
volumes: shares /home/myuser/tmp/image2udp_sock with the container
devices: gives the container access to /dev/video0
network_mode: host: needed if you're sharing the host network
Step 3: Launch the Container
If you don't want to run the container as root, add to the docker-compose file:
user: "${MY_UID}:${MY_GID}"
And export those values in your shell before running Docker Compose:
export MY_UID=$(id -u)
export MY_GID=$(id -g)
Run docker compose
docker compose up -d
The container will start, and should create the socket at:
/sockets/test.sock  (inside container)
== maps to ==
/home/myuser/tmp/image2udp_sock/test.sock  (on host)
Verify the Socket on Host
ls -l /home/myuser/tmp/image2udp_sock/test.sock
Step 5: Run a Host-Side Demo Client
The demo application will generate the packets with image and metadata and send them to Image2udp precessor over the Unix Domain Socket.
Make sure that frame resolution is the same for both, demo application and image2udp processor.
If you run container as root, use sudo.
./Bmp2UnixDomainSocket2Udp --resolution 640x480 --pattern colorbars --targetSocket /home/myuser/tmp/image2udp_sock/test.sock
Step 6: Cleanup
To stop and remove the container:
docker compose down
Remove the socket, if not needed anymore
rm -f /home/myuser/tmp/image2udp_sock/test.sock
Low latency preview:
Use StPlayer
Configure low latency mode.

Latency:
You can configure the preview of the received images.
Here is an example of the latency (between image reception -> encoding -> streaming -> decoding -> presentation)
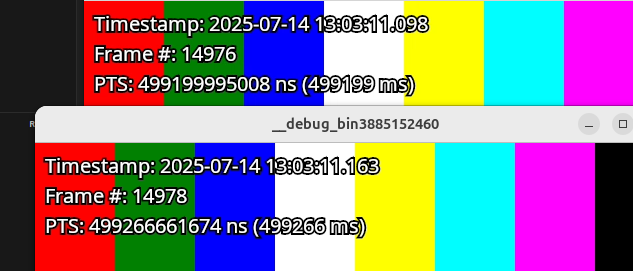
Measured latency - 2 frames
Packet structure:
Here is the current packet structure memory allocation:
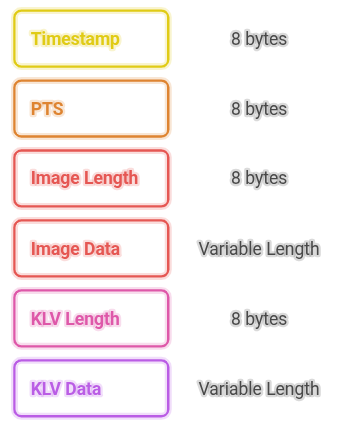
⚠️ Note. The 8 bytes data length is currently selected for simplicity. This will be changed in the future releases.